Monday, November 16, 2009

Berries Leftover Part 2: Strawberry Hand Pies

This is the last of the Berries Leftover series and I've used the strawberries left over from my mini fruit tarts. i found the recipe on Martha Stewart's website and, needless to say, another delicious treat! The Pâte Brisée is just absolutely fabulous!

Strawberry Hand Pies
Makes 6

1 1/2 cups strawberries, hulled and cut in half or quarters, depending on size
2 tablespoons granulated sugar
1 tablespoon cornstarch
All-purpose flour, for work surface
1/2 recipe Pâte Brisée (see below)
1 large egg, lightly beaten
Sanding sugar, for sprinkling

Preheat the oven to 425 degrees F. Line a baking sheet with parchment paper. In a medium bowl, add strawberries, sugar, and cornstarch; stir to combine, set aside.

On a lightly floured work surface, roll dough into a large rectangle, about 1/8 inch thick. Using a 5-inch cookie cutter, cut out 6 rounds. Transfer rounds to prepared baking sheet.

Place about 2 tablespoons of the strawberry mixture onto one-half of each round. Lightly brush egg around the edge of the covered half of each round. Fold remaining dough over to enclose, forming a half moon. Gently press edges together to seal. Brush the tops of each pie with egg. Using a paring knife, slash the top of each pie. Sprinkle generously with sanding sugar.

Bake until golden brown, 20 to 25 minutes. Transfer pies to a wire rack to cool slightly before serving. Or let cool completely, and store in an airtight container at room temperature up to 4 days.

Pâte Brisée

2 1/2 cups all-purpose flour
1 teaspoon salt
1 teaspoon sugar
1 cup unsalted butter, chilled and cut into small pieces
1/4 to 1/2 cup ice water

In the bowl of a food processor, combine flour, salt, and sugar. Add butter, and process until the mixture resembles coarse meal, 8 to 10 seconds.

With machine running, add ice water in a slow, steady stream through feed tube. Pulse until dough holds together without being wet or sticky; be careful not to process more than 30 seconds. To test, squeeze a small amount together: If it is crumbly, add more ice water, 1 tablespoon at a time.

Divide dough into two equal balls. Flatten each ball into a disk, and wrap in plastic. Transfer to the refrigerator, and chill at least 1 hour. Dough may be stored, frozen, up to 1 month.

Thursday, November 12, 2009

Leftover Berries Part 1: Raspberry and Blueberry Vanilla Pound Cake

After a week of cake decorating, I wanted to bake something really simple but oh so flavorfull. I also had some raspberries and blueberries left over from the mini tarts that I wanted to use, hence the berry pound cake.


Let's just say it's so yummy, that half of it was gone in less than an hour... and we are only 3 at home!!


Vanilla Pound Cake

Adapted from Dinner with Kirsten

fresh raspberries
fresh blueberries
3 cups all-purpose flour
2 teaspoons baking powder
1/2 teaspoon salt
2 sticks (8 ounces) unsalted butter, at room temperature
2 cups sugar
3 large eggs, at room temperature, whisked to blend
1 cup milk, at room temperature
2 teaspoons pure vanilla extract

Position a rack to the lower third of the oven and preheat to 350 degrees. Butter and flour a 10-inch tube pan. Mix the berries with 2 tablespoons of the flour and keep in fridge.

Sift the remaining flour, baking powder and salt together into a bowl or onto a sheet of waxed paper. Set the mixed ingredients aside.

Put the butter into the bowl of a mixer and beat at medium speed until smooth. With the mixer running, add the sugar in a steady stream. Stop the mixer and scrape down the paddle and the sides of the bowl with a rubber spatula. Continue to beat at medium speed until the mixture is very light and fluffy, about 4 to 5 minutes.

With the mixer still at medium speed, begin to add the eggs in small additions, about a tablespoon at a time. If the mixture becomes watery or shiny, stop adding the eggs and beat at an increased speed just until it smooths out. When the batter has come together again, decrease the speed to medium and continue adding the eggs, scraping down the paddle and sides of the bowl from time to time; it will take 3 to 4 minutes to incorporate the eggs. The mixture is properly combined when it appears white, fluffy and increased in volume.

Reduce the mixter speed to low and add the flour mixture and the milk alternately—4 additions of flour, 3 of milk—scraping the paddle and bowl frequently and mixing until the batter is smooth after each addition. Add the vanilla and mix just to blend. Fold in very gently the berries with a spatula.

Spoon the batter into the prepared pan and smooth the top with a spatula. Bake for 55 to 65 minutes, or until a wooden toothpick inserted in the center of the cake comes out clean. Transfer the cake to a cooling rack and allow it to cool in the pan for 10 minutes. Invert the cake onto a rack, remove the pan, and cool to room temperature.

Monday, October 26, 2009

October DB Challenge: French Macarons

The 2009 October Daring Bakers’ challenge was brought to us by Ami S. She chose macarons from Claudia Fleming’s The Last Course: The Desserts of Gramercy Tavern as the challenge recipe.

Who ever said that third time is a charm? Well they were fools! Or at least this concept doesn't apply to macarons because, in my case, it took me 4 tries before getting good looking macarons, with the little ruffled feet and a nice height and dry bottoms... no bellies left behind on the baking tray!! Yaaaa!!

First batch are chocolate macarons with a whipped chocolate ganache and a few with chatilly cream and a fresh raspberry half hidden inside. The feet are a little tiny and tops cracked on half of the batch but I "fixed" the problem with my second batch.


Second batch are pink macarons with raspberry curd, smooth shiny tops and beautifully ruffled feet. Since October is Breast Cancer Awarness month, I wanted to go with the pink theme. I didn't have powder food coloring for the shells. I had only gel coloring, which explains the pink freckles... totally unintentional but sooo cute!!


Those who know me well also know that I've been "studying" the art of macaron making for about a year now but never really had the courage to try my luck. I've read everything that I could find on macaron but yet always left them on my "to bake list".

It is hard to believe that something created out of 4 normal ingredients could be so hard to get and to be honest with you I'm scared of trying again... what if I got them right out of pure coincedence? I'd like to think that I actually was able to muster enough self-confidence to not let the macaron overpower me, so to all of you out there who are still trying to bake macarons DO NOT give up! Keep on going until you get it right because it is oh so worth it!


Now I know what all the rave was about... Now I am a new macaron lover!

Friday, June 19, 2009

Summer Breeze Cupcakes (ICE June: Summer Berries)

I'm baaaaaack!!!

I haven't submitted a cupcake for the ICE Challenges since a while, I never seemed to be inspired by the ingredients... until this month! I absolutely adore summer berries and my inspiration juices came back!

When summer comes around I usually eat less and try to stay as light as possibile. Not because of the whole "fit-in-your-bikini" story but it just happens on its own, I lose my appetite for heavy, fatty, greasy stuff. On the other hand, I crave fresh food, especially fruits. This got reflected in my cupcakes this month: sorry guys, no buttercreams and no chocolate this month!

Instead I propose light as feather meringues, tangy lemon, crunchy almonds and fresh berries!


These are almond cupcakes with a center of lemon curd cream and freash strawberry or raspberry. The are topped with a super delishously sweet meringue.


If you liked my cupcakes, please vote for me!! To cast your vote go to No One Puts Cupcake in a Corner!! Voting starts on June 28th at 8pm and ends on July 6th at noon.

RECIPE FOR 12 CUPCAKES:

Almond cupcakes (from Canadian Living)
1/2 cup butter, softened
1 cup granulated sugar
2 eggs
1/2 tsp almond extract
1 cup all-purpose flour
1/2 cup ground almonds
1 tsp baking powder
1/4 tsp salt
1/2 cup milk

In large bowl, beat butter with sugar until fluffy; beat in eggs, 1 at a time. Beat in almond extract.

In separate bowl, whisk together flour, ground almonds, baking powder and salt. Stir into butter mixture alternately with milk, making 3 additions of dry ingredients and 2 of milk. Spoon into paper-lined or greased muffin cups.

Bake in 350°F (180°C) oven until cake tester inserted in centre comes out clean, 20 to 25 minutes. Transfer to rack; let cool.


Lemond Curd Cream (from Tartelette)
grated zest of 1 lemon
1 cup lemon juice
1/2 cup sugar
2 eggs
1 cup heavy cream
fresh rapsberries and strawberries

Combine the zest, sugar, juice in a saucepan, and bring to a simmer. In a small bowl, beat the eggs until light. Beat some of the lemon mixture into the eggs to temper.

Scrape the mixture back into the saucepan and cook stirring constantly until it thickens up, about 5 minutes. Strain and let it cool to room temperature, covered with plastic wrap until ready to use.

In a stand mixer, whip the cream to medium stiff peaks. Incorporate the cooled lemon curd in three additions. Cut the cupcakes in two layers, remove some cake from the center of each layer. On the bottom spoon some cream, put a berry, spoon some cream in the top layer and recompose the cupcake.


Meringue tops
2 large egg whites, at room temperature
1/4 tsp white vinegar
1/3 cup granulated sugar
1/4 cup powdered sugar, sifted

Preheat oven to 175ºF. Line a large baking sheet with parchment paper.

Beat the egg whites and vinegar with an electric mixer until they turn white and hold soft peaks. Still beating, add the granulated sugar a little at a time—you’ll have a shiny, bright-white meringue. Keep beating, gradually adding the powdered sugar. Pipe (or spoon for a more rustic look) the sticky meringue onto the baking sheet.

Bake until you can easily detach the meringue puffs from the parchment and they have lost their shine.


Our June ETSY PRIZE-PACK is from artists: INSANEJELLYFISH, SWEET CUPPIN CAKES CUPCAKERY SUPPLY and CAKESPY

Our corporate prize providers: HEAD CHEFS by FIESTA PRODUCTS, HELLO CUPCAKE by Karen Tack and Alan Richardson, JESSIE STEELE APRONS , TASTE OF HOME books and UPWITHCUPCAKES.COM will be providing our winner with one of their cute cupcake attitue t's!

Monday, February 23, 2009

Strawberry heart and apple blossom mini doughnuts

So friday was my birthday! Already 25 years old... seems like yesterday that I was just turning 20! Should I bake myself a cake? No, my mom will probably get one for me... but I need something sweet on my birthday! So what if.... a favorite and an innovation were on the way of being created.


I L-O-V-E doughnuts! Specially the ones filled with strawberry jam and covered in powdered sugar. So I had to have them for my birthday and because I love them so much I made them heart shaped.

I also love the combination of apples with cinnamon. The idea blossomed in my head that maybe I can turn this combo into a doughnut. I added half an apple peeled and grated (well strained) to half of the dough, cut them with a flower cookie cutter and filled them with a cinnamon whipped cream.


These little beauties made my day! The strawberry ones are a classic, they never fail you but the apple blossoms, as I call them, were quite a discovery! The taste of apple isn't too overwhelming but the cinnamon in the whipped cream really sets it off and enhances it.

For the doughnuts
1 egg
300 gr flour
15 gr fresh active yeast
100 ml milk, warm
30 gr butter
30 gr sugar
1 tsp vanilla
pinch of salf

oil to fry

Disolve the yeast in the warm milk. In the meanwhile, melt the butter and make a well with the flour. In the center, place all the other ingredients including the yeast milk. Combine the ingredients and knead the dough until you form an elastic ball of dough. Sprinkle some flour on it, place it in a bowl and cover it. Place in a draft-free room and let it proof for 2 hours.

Roll the dough to about 1 cm tick and cut out your doughnuts. They can be round or of any shape you want, as long as it's not too complex. This is not a good time to take out that dinosaur cookie cutter! Let the doughnuts proof again, covered, for another hour or so.

In medium saucepan over medium heat, heat oil until a deep-frying thermometer registers 370 degrees. I don't have a thermometer so I test the oil with a little piece of dough. Once dropped in the oil it should sizzle on the sides but not turn brown too quikly. Using a slotted spoon, carefully slip 3-4 doughnuts (depending on their size) into oil. Don't overcrows your saucepan! This will cause the oil temperature to drop and you won't be able to fry right!

Fry until golden, about 40 seconds on each side, and transfer to a paper-towel-lined baking sheet. Roll in sugar while warm or sprinkle with powedered sugar. Fill a pastry bag fitted with a #4 tip with favorite jam, whipped cream, butter cream... go crazy! Using a wooden skewer or toothpick, make a hole in the side of each doughnut. Fit the pastry tip into a hole, pipe about 2 teaspoons of filling into doughnuts.

(I used half of the dough to which I added half an apple, peeled, grated and very very very well strained to make the apple blossoms. You might need a bit more flour for these ones to counterbalance the moisture added by the apples.)

Cinnamon whipped cream
1 cup whipping cream
2 tbsp powdered sugar
1 tsp cinnamon

Combine the whipping cream, the sugar and cinnamon in a medium bowl. Whip until medium soft peaks form and fill your doughnuts!

Friday, February 6, 2009

ICE February - Coffee: Have a cup of Tiramisu' cupcake!

Coffee has to be, no doubt in my mind, the hot beverage that is the most consumed in the western world. I just have to take a look around campus when I'm at school and one out of two, max three, students has a cup of some kind of coffee in their hands.

I must admit, I'm not a huge fan of straight-up coffee. I like it when it's mixed with some kind of other flavor. So I admit, when I first saw that this month's ICE secret ingredient was coffee, I cringed a little! But I took a deep breath, went back to my roots and thought "I'm Italian, coffee has to somehow, in some way, run through my blood... no problem!"

We could live off of coffee alone if that were possibile! We use it in every way we can, as much as we can and the two most popular ways to consume coffee for an Italian it's spiked with Sambuca (a sweet anise-flavoured italian liqueur) or in our national most famous dessert: Tiramisu' (which my mom also does with some Sambuca in the coffee used to soak the cookies in... addicted much?!).

So it all came oh so clear to me... a Tiramisu' made into a cupcake! This is a Sambuca flavoured cupcake with coffee buttercream, topped with a chocolate ganache and mascarpone cheese frosting. Of course I just couldn't resist making little coffee cups out of them (all out of fondant)!


If you liked my cupcakes, please vote for me!! To cast your vote go to No One Puts Cupcake in a Corner!! Voting starts on March 1st at 8pm and ends on March 6th at noon.

Sambuca Cupcakes
(yields 12 cupcakes)

3/4 cup (170g) unsalted butter, softened
1 1/2 cups granulated sugar
6 large egg whites
10 tbsp whole milk
2 tbsp Sambuca liqueur
2 teaspoons pure vanilla extract
2 cups all-purpose flour
2 teaspoons baking powder
1/4 teaspoon coarse salt

Preheat oven to 350F/180C. Line a 12-cup muffin pan with paper baking cups; set aside.

Put butter and granulated sugar into the bowl of an electric mixer fitted with the paddle attachment; mix on medium speed until pale and fluffy, about 3 minutes. Add egg whites, milk, sambuca, and vanilla extract; mix until combined, scraping down sides of bowl as needed. Add flour, baking powder, and salt; mix until just combined.

Divide batter among paper baking cups in muffin pan, filling each cup about 3/4 full. Bake in preheated oven until very light golden brown, approximately 24-27 minutes. Transfer pan to a wire rack; let cool completely.


Coffee buttercream (from Tartelette)
(it will make more than you need but freeze the leftovers for up to 3 months)

1 cup sugar
1/3 cup water
2 large eggs
3 sticks (1 1/2 cups) unsalted butter, softened
3 tablespoons instant espresso powder dissolved in 1 tablespoon hot water

In a small heavy saucepan set over medium heat, dissolve the sugar in the water. While stirring bring the mixture to a boil, and continue to cook until it registers 240F. on a candy thermometer. In the bowl of a stand mixer with the whisk attachment or with a hand held beater beat the eggs until they are frothy. Add the sugar syrup in a thin stream, beating, and beat the mixture until it is cool. Change to the paddle attachment and add in the butter, 1 tablespoon at a time, the espresso mixture, and beat the buttercream until it is combined well. Leave at room temperature so it will be easier to spread.


Chocolate ganache
(again, you'll probably have more than needed... make a Sacher Torte!)

90 ml heavy cream
90 gr bittersweet chocolate

In a heavy saucepan set over medium heat, bring the heavy cream to a boil. Remove from the stove and pour on the chopped chocolate. Let stand 2 minutes and then stir until fully combined. Let cool until firm enough to spread on top of the cupcakes.


Mascarpone Cheese frosting (recipe from Martha Stewart)
(enough to generously frost 12 cupcakes)

1 pound mascarpone cheese
1/2 cup confectioners sugar
1 1/4 cups heavy cream

In the bowl of an electric mixer fitted with the paddle attachment, beat the mascarpone, cream and confectioners' sugar until medium-soft peaks form, 1 to 2 minutes. Be careful no to overbeat and use immediately.


Our February ETSY PRIZE-PACK is from artists: DIANAEVANS, LOTS OF SPRINKLES, SWEET CUPPIN CAKES BAKERY AND CUPCAKERY SUPPLY and CAKESPY

Our corporate prize providers: HEAD CHEFS by FIESTA PRODUCTS, HELLO CUPCAKE by Karen Tack and Alan Richardson, JESSIE STEELE APRONS , the CUPCAKE COURIER, TASTE OF HOME books and UPWITHCUPCAKES.COM will be providing our winner with one of their cute cupcake attitue t's!

Thursday, January 29, 2009

The world is yours... with tuiles!!

This month's challenge is brought to us by Karen of Bake My Day and Zorra of 1x umruehren bitte aka Kochtopf. They have chosen Tuiles from The Chocolate Book by Angélique Schmeink and Nougatine and Chocolate Tuiles from Michel Roux.

I was overjoyed when I saw that the new DB challenge for this month was a one-step, one-day recipe. Very straight forward but oh so tasty! And the world is yours with tuiles cookies, you can make ANYTHING you want. It's a genius little thing really.

I'm going to be rather short today, feeling a little under the weather... metaphorically and literally after receiving 30 cm of snow yesterday. I decided I was going to officially declare myself snowed in today.

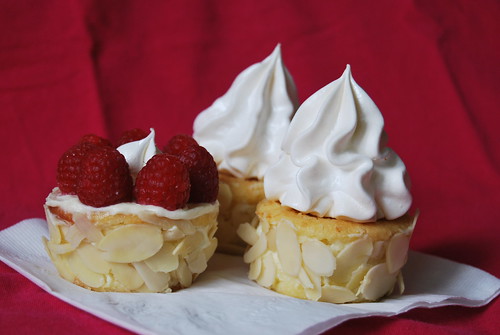
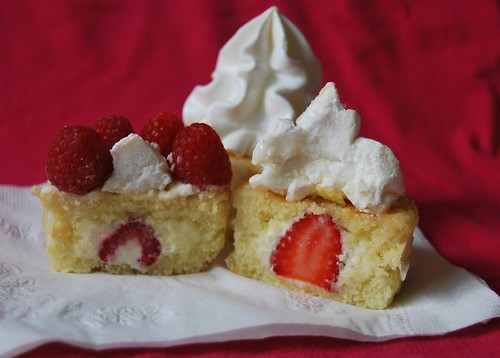
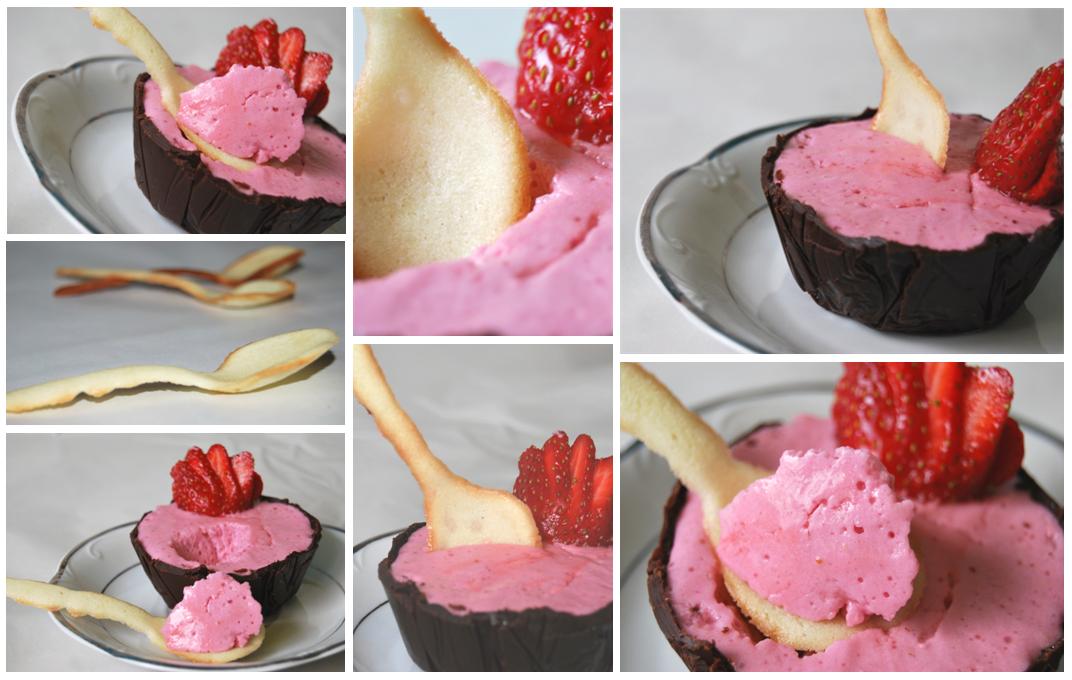
Making tuiles was really fun and very educational. I think tuiles are one of the basics in the pastry world and it's an essential really. I shaped the tuiles into a spoon and paired them with a chocolate cup of strawberry mousse prepared following last month’s challenge recipe. I still have to work on my chocolate cup making skills but I'll get there. To get the spoon shape, I used a spoon template and once they were baked, I gently pressed them in between two little spoons until they held there shape. They cool down very quickly so you have to move fast.


Here are all the recipes you need to create this sea of deliciousness. Ok, back to bed... I think I’ll watch a movie. I think I’ll go for Sex and the City...

Tuiles
¼ cup softened butter (not melted but soft)
½ cup sifted confectioner’s sugar
1 sachet vanilla sugar
2 large egg whites (slightly whisked with a fork)
1/2 cup sifted all purpose flour
1 tbsp cocoa powderor food coloring of choice to decorate (optional, I didn't use)
Butter/spray to grease baking sheet

Preheat oven at 180C / 350F

Using a hand whisk or a stand mixer fitted with the paddle (low speed) and cream butter, sugar and vanilla to a paste. Keep stirring while you gradually add the egg whites. Continue to add the flour in small batches and stir to achieve a homogeneous and smooth batter/paste. Be careful to not overmix.
Cover the bowl with plastic wrap and chill in the fridge for at least 30 minutes to firm up. (This batter will keep in the fridge for up to a week, take it out 30 minutes before you plan to use it).

Line a baking sheet with parchment paper or grease with either butter or spray and chill in the fridge for at least 15 minutes. This will help spread the batter more easily if using a stencil/cardboard template. Press the stencil of your choice on the baking sheet and use an off sided spatula to spread batter. Leave some room in between your shapes. Mix a small part of the batter with the cocoa and a few drops of warm water until evenly colored. Use this colored batter in a paper piping bag and proceed to pipe decorations on your tuile if desired.

Bake in a preheated oven for about 5-10 minutes or until the edges turn golden brown. Immediately release from baking sheet and proceed to shape/bend the cookies in the desired shape. These cookies have to be shaped when still warm, you might want to bake a small amount at a time or maybe put them in the oven to warm them up again or place a baking sheet toward the front of the warm oven, leaving the door half open. The warmth will keep the cookies malleable.


Strawberry Mousse
2 medium-sized egg yolks
2 Tbsp cornstarch
1/3 cup whipping cream
200g strawberry puree
1/2 cup granulated sugar
36g water
2.5 gelatin leaves or 2+1/4 tsp powdered gelatin
3 medium-sized egg whites

Beat the egg yolks with the cornstarch until thick, white and fluffy.
Heat the cream in a medium saucepan and once hot, pour a small amount over the egg yolks while whisking vigorously.

Pour the egg yolk mixture back into the rest of the cream in the saucepan; add the strawberry puree and cook, stirring constantly, until it thickens considerably, at least 3-5 minutes. Let cool to lukewarm temperature.

Make an Italian Meringue: Cook the sugar and water on medium heat until temperature reaches 244°F (118°C) when measured with a candy thermometer. If you don’t have a candy thermometer, test the temperature by dipping the tip of a knife into the syrup then into a bowl of ice water. If it forms a soft ball, you’ve reached the proper temperature.

Beat the egg whites until foamy. Pour the sugar syrup into the whites in a thin stream while continuing to whisk vigorously (preferably with a mixer for sufficient speed). Whisk/beat until cool (approximately 5 minutes). The meringue should be thick and glossy.

Soften the gelatin in cold water and melt in a small saucepan with 1 tsp of water OR melt in the microwave for 1 second (do not boil).
Put the melted gelatin in a mixing bowl and, while whisking vigorously, pour the lukewarm strawberry cream over the gelatin.

Carefully blend the Italian meringue into the strawberry mixture. I also added a few drops of pink food coloring to get a nicer, brighter shade of pink. Spoon into chocolate cups and serve.

Thursday, January 22, 2009

Phyllo Apple Strudels and not a great satisfaction

I believe that blogging shouldn't be only to show off you're successes but also to share your not so good baking experiences and discuss about them so you can improve... So here I am...

I had envisioned these amazing mini strudels, hand-pie style, made out of phyllo dough because I had some in my freezer and was fed up of seeing it sitting there. Although the apple filling was delicious, I was really pleased with the aspect of the strudels. The phyllo dough just ended up breaking all over the place and it was just hell to take them off of the baking sheet. But here I think it was my mistake, I think I let them sit too long on the sheet and the juices that came out of them had the time to solidy, gluing the strudels on the sheet. When I tried to take them off a few just totally fell apart, others left their bellies on the sheet... This is how you learn from your mistakes right? I am learning...


Taste wise, it was really really good! Especially dunked into the creme anglaise which is simply and absolutely delicious... it was like a grandma's apple pie and vanilla ice cream all in one!


I divided 6 huge sheets (placed one of top of the other) of phyllo dough into 12 squares to make mini individual portions, using the quantities shown below which are originally meant for one big strudel.

Apple Strudel
(yields big strudel for 8 servings)

4 apples, peeled and quartered
1/2 cup brown sugar
1/4 cup chopped pecans
1/4 cup raisins
1 tsp grated lemon juice
1/2 tsp cinnamon
6 sheets phyllo dough
1/2 cup butter, melted (approx)
1/3 cup fine dry bread crumbs

Finely slice the apple quarters crosswise. Place them in a bowl and toss them with the sugar, the nuts, raisins, lemon juice and cinnamon; set aside for about 30 minutes to allow all the flavors to mingle togather.

Place 1 sheet of phyllo on a damp tea towel. Cover remaining phyllo with another damp cloth and brush the sheet with some of the butter; sprinkle with 1 tbsp of the bread crumbs.

Layer remaining phyllo, brushing each sheet with butter and sprinkling with remaining bread crumbs.

About 2 inches (5 cm) from one of the long edge of the phyllo, spoon the apple mixture lengthwise down the dough in a 3-inch (8 cm) wide strip, leaving a 2-inch (5 cm) border of pastry at each short end.

Starting at long edge nearest the filling, carefully begin to roll the phyllo over filling, rolling up the strudel jelly roll-style and folding in the edges as you roll.

Roll up firmly but allow a little slack for expansion while it bakes. Carefully place the strudel seam side down on a greased baking sheet and brush it with butter.

Cut 7 slits in the top and bake in 400°F (200°C) oven for 30 to 35 minutes or until crisp and golden. Transfer to rack or serving platter.


Creme anglaise (from Joy of Baking)
(yields about 2 cups)

2 cups light cream or half and half (12%-18% butterfat)
1 vanilla bean, split lengthwise or 2 teaspoons pure vanilla extract
1/3 cup granulated sugar
5 large egg yolks

In a stainless steel bowl stir with a wooden spoon, the sugar and yolks until well blended.

In a small saucepan heat the cream and vanilla bean (if using the extract, it will be added at the end) just to the boiling point. Remove from heat and whisk a few tablespoons of the cream into the yolk mixture. Then, gradually add the remaining cream, whisking constantly.

Pour this mixture back into the saucepan and, over medium heat, gently heat the mixture to just below the boiling point. You will notice that steam will begin to appear and the mixture will be slightly thicker than heavy cream. Do not boil or the eggs will curdle. Check to see if it is the right consistency by holding a wooden spoon sideways that is covered with the custard and run your finger along the back of the spoon. If the streak remains without the cream running down through the streak, it is ready.

Immediately remove from the heat and pour through a strainer, scraping up any thickened cream that settles on the bottom of the pan. Remove the vanilla bean and scrape the seeds into the sauce. Stir until seeds separate. For maximum flavor, return the pod to the sauce until serving time. *If you are using pure vanilla extract, instead of the vanilla bean, add it to the cream now.

The creme anglaise can be refrigerated covered with plastic wrap for a couple of days.

Wednesday, January 14, 2009

ICE January: Chocolate Champagne cupcakes with a white chocolate strawberry truffle center and strawberry whipped cream

The January Iron Cupcake Earth challenge was wine, any kind of wine and since I had some Champagne left from New Years... Why not?!

These rich and dense chocolate brownie-like cupcakes have a white chocolate truffle heart which hides a little piece of fresh strawberry. The strawberries were also used in the whipped cream frosting. What's more tempting than champagne with chocolate and fresh strawberries?!

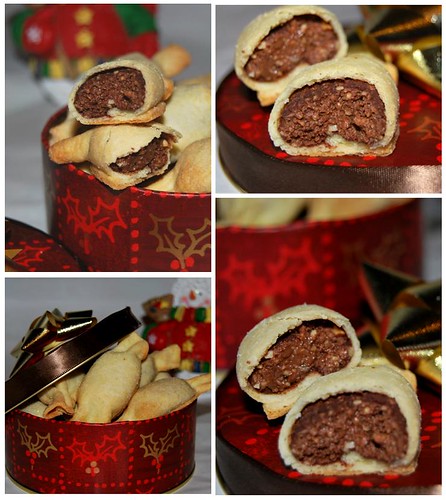
Plus, aren't chocolate, champagne and strawberries aphrodisiacs or something? Well, here you have all three in one... kinda like a love making cupcake! Perfect for Valentine's Day or a special dinner! AND there's whipped cream... now really, what can we ask more?? Make sure you don't eat the truffles before putting them in the cupcakes... half of mine were left "truffle-less": they are AMAZING even on their own, maybe even more so!

If you liked my cupcakes, please vote for me!! To cast your vote go to No One Puts Cupcake in a Corner!! Voting starts on January 29th at 8pm and ends on February 4th at noon.


Chocolate Champagne cupcakes (original recipe from Krishna Brown)
yields 12

8 ounces 70% dark chocolate
6 tbsp unsalted butter
1 cups sugar
1/4 teaspoon salt
1 tsp baking powder
1/2 tbsp vanilla extract
2 large eggs
6 tbsp flour
1/2 cup champagne

Preheat oven to 350 degrees.
Melt the chocolate with the butter in a double boiler.
Beat the salt, baking powder, vanilla and sugar into the melted chocolate.
Add the eggs into the chocolate mixture, beating them in one at the time. Add the flour to the mixture and mix until blended.
At this point, add the champagne and beat on high speed for about 3 minutes, until the mixture is shiny.
Pour the mixture into the prepared muffin tin and bake about 30 minutes or until a toothpick inserted in the center comes out with crumbs stuck to it if you want a moister cupcake, or else bake a bit longer.

Let the cupcakes cool completely and then make a whole in their center, going half way down the cupcake. Insert the white chocolate truffle in the hole and cover with the cupcake piece that was removed. It is very important that the cupcakes aren't warm anymore or else the truffles will melt. Set them in the fridge while preparing the frosting.

White Chocolate Strawberry Truffles
yields about 15

4 ounces white chocolate
2 tbsp + 2 tsp heavy cream
1/2 tbsp unsalted butter
fresh strawberries (I used the tips cut off)

In a small saucepan, bring the cream to a simmer. Add the butter and stir until melted. Pour the cream over the white chocolate, let sit for a few seconds and then stir until completely melted and smooth. Cool, cover, and refrigerate the mixture until firm, at least 2 hours.
Using a melon baller or small spoon, roll the mixture into little balls. Press down the middle with your thumb and nestle a piece of strawberry inside, roll the truffle back into a ball and put back into the fridge for about 1 hour or until ready to use.

Strawberry Whipped Cream
yields about 2 cups

1 cup heavy whipped cream
1/2 teaspoon vanilla extract
1 tbsp granulated sugar
1/2 cup lightly sweetened strawberry puree

In a large mixing bowl place the whipping cream, vanilla, and sugar and stir to combine. Cover and chill the bowl and beaters in the refrigerator for at least 30 minutes. When chilled, beat the mixture until soft peaks form.
Then add the strawberry puree a little at a time, and beat just until stiff peaks form when the beater is raised. Taste and fold in more sugar or puree, if required.


Our January ETSY PRIZE-PACK is from artists: DOGBONE ART, LOTS OF SPRINKLES, CAKESPY, and SWEET CUPPIN CAKES BAKERY AND CUPCAKERY SUPPLY.

Our corporate prize providers: HEAD CHEFS by FIESTA PRODUCTS, HELLO CUPCAKE by Karen Tack and Alan Richardson, JESSIE STEELE APRONS , the CUPCAKE COURIER, TASTE OF HOME books and UPWITHCUPCAKES.COM will be providing our winner with one of their cute cupcake attitue t's!

Thursday, January 1, 2009

Nutella-Almond Papillotes

Before I do anything else, I'd like to wish you all a happy New Year and may it bring you lots of joy and happiness, but mostly love and yummy moments!

Speaking of yummy, I just had to share this recipe with you! These papillote cookies became a Christmas tradition in our family. But beware: they are HIGHLY addictive and you won't be able to stop just at one or two. After the first one your hand will go take another and another and another without you even noticing; and by the time you realize it, you'll have eaten at least a dozen of them!!


The recipe is for "industrial quantities" as I need to bake a lot of them to get through the holidays without running out, but you can cut it in half or more if needed.


Nutella-Almond Papillotes
(yields approx. 150 cookies)


For the dough
1 cup milk, lukewarm
1 tbsp active dry yeast
4-5 cups flour
450 gr of Tenderflake lard
6 eggs
1 tsp of baking powder

For the filling
1,5 kg Nutella (2 jars of 750 gr each)
680 gr toasted almonds (approx. 4 cups)

Warm up the milk until lukewarm and dissolve the yeast in it. In a bowl cut in the flour with the lard using a food processor. Add in milk and yeast mixture.

In a separate bowl beat the eggs and add them to the dough batter with the baking powder. Incorporate them well and proceed to knead the dough by hand until it is medium soft, adding some flour if needed.

Sprinkle a bit of flour at the bottow of a bowl and place the ball of dough in it. Refrigerate overnight covered with a plate.

The day after roast the almonds and crush them into small pieces. Mix the almonds well into the Nutella. Mix a cup of flour and a cup of sugar in bowl that you will use to roll your dough with a rolling pin.

Roll your dough to about 1/8 in. (3 mm) of thickness and cut out disc shapes of approx. 10-12 cm in diameter. In the center of each circle place one teaspoon of the nutella mixture and fold the disc over it, pinching the ends to form a candy-like shaped cookie.

Place you cookies on a greased baking tray and bake at 350F/175C for 12-15 mins or until golden.