Sunday, April 25, 2010

Raspberry White Chocolate Financiers

About a month a go I've decided that I'll start taking of myself, of my body and of my soul. So I signed up at the gym, tiring of looking at myself in the mirror and not liking what I see. Now when I bake I reduce the recipe at least by half so I'm not stuck with a 2 dozens cupcakes to eat on my own... but one a week or so can't hurt too much right?!

Anyway at the gym they made me pass some tests that determine your real physical age as opposed to your biological age. It turns out I'm a 26 year old in the body of a 62 year old (a really out of shape one, I'm sure about it), my BMI is at 40% but, there's always a silver lining however small it might be, apparently my abs are really strong... somewhere under all the belly fat!

So I've been working out and, to put all odds on my side, tomorrow I'm starting a new diet. Surprisingly I really like being in the gym!! Granted I busted my BOTH my ankles after the first week but I'm assuming it's because my body isn't used to all that movement! So my goal is to lose at least 30 lbs by August... 10 lbs a month, I should be able to do that! I'll weigh myself only once a month, on the lasy day and I'll keep you posted!

But for now, I'll share with you this delicious recipe. Delicate, delicious, small cakes with white chocolate and raspberries, these financiers are supre quick to put together but are of major wow factor.
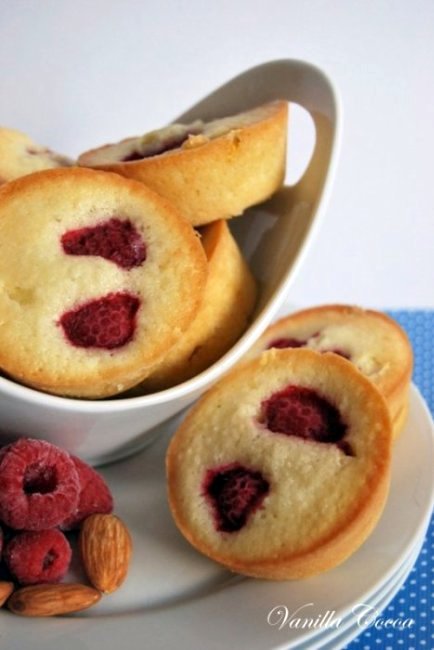


Raspberry White Chocolate Financiers
Adapted from The Golden Book of Chocolate
Yields about 48

1 cup ground almonds
1 cup confectioner's sugar
2/3 cup all-purpose flour
1/2 tsp baking powder
1/3 cup butter, melted (I turned it into beurre noisette, as traditional fianciers require)
6 egg whites, lighly beaten
1/2 frozen raspberries
2 oz white chocolate, finely chopped


To make beurre noisette cut the butter in small pieces and melt over low/medium heat. The butter will start to boil, let it go until it becomes of a dark amber color and starts smelling like toasted hazelnuts. Immediately remove from heat and pour in a glass recipient to stop the cooking process, let cool. If you don't want to do a beurre noisette just melt the butter normally but go noisette, you won't regret it!

Preheat the oven to 350F and oil 24 mini oval pans (which i don't have so I just PAMed some muffin tins). Place the almonds, confectioner's sugar, flour and baking powder in a large bowl.

Pour in the cooled beurre noisette and mix until combined. Add the egg whites and mix until smooth and well incorporated. Spoon the batter in the prepared pans so that they are about half full. Push a few raspebbies on top of each financiers and spinkle with the chopped white chocolate (I mixed the chocolate in the batter right before spooning it in the pans so I can have some in every bite!).

Bake until golden and firm but still moist in the center, about 10-12 minutes (Mine took a little longer I guess because more batter goes into the muffin pans). Turn out onto a wire rack and let cool.

Tuesday, March 16, 2010

World Peace Cookies and finally some sugar!!!


Finally the sun has permanently come out and it doesn't look like it wants to go away any time soon, which is great because I work using solar energy. If the sky is gray then I'm gray and can't seem to function.

But now the sun is out, the snow has MELTED!!! And it's starting to look a lot like Spring! I love this time of the year, I feel like Nature is not the only thing that's about to come back to like. I also feel full of hope and new life. I feel like I can conquer the world when Spring comes along... If only I could stop procrastinating now!

Anyway, it's been a very long while since I've baked something for myself and I was starting to be in sugar withdrawal. With the bakery it feels like whenever I take out the butter and eggs it's always to do something for someone else. So, yesterday I've decided I was going to do something for me, myself and I. I've been seeing these World Peace cookies (or Korova cookies) all over the web now and when I realized that I actually had the baking book (Baking: From my home to yours from Dorie Greenspan) with the recipe, curiosity own and I had to bake them.

And trust me, they are well deserving of all the praises and rave reviews they've been getting. Salty but sweet, more of a sablé than a chewy cookie, they literally melt in your mouth. They're absolutely delicious... only problem is that you won't be able to stop eating them. I had to take them away from my mom, actually she begged me to hide them from her (after eating 6 of them one after the other!!).

So my advice would be this one: bake them, enjoy them, and give some away! After all, they are World Peace cookies so spread some joy around you!! (your waist line will thank you! )


World Peace/Korova Cookies
(From Baking: From my home to yours)

Makes about 36 cookies

1 1/4 cups all-purpose flour
1/3 cup unsweetened cocoa powder
1/2 teaspoon baking soda
1 stick plus 3 tablespoons unsalted butter, at room temperature
2/3 cup (packed) light brown sugar
1/4 cup sugar
1/2 teaspoon fleur de sel or 1/4 teaspoon fine sea salt
1 teaspoon vanilla extract
5 ounces bittersweet chocolate, chopped into chips, or a generous 3/4 cup store-bought mini chocolate chips

Sift the flour, cocoa and baking soda together.

Working with a stand mixer, preferably fitted with a paddle attachment, or with a hand mixer in a large bowl, beat the butter on medium speed until soft and creamy. Add both sugars, the salt and vanilla extract and beat for 2 minutes more.

Turn off the mixer. Pour in the flour, drape a kitchen towel over the stand mixer to protect yourself and your kitchen from flying flour and pulse the mixer at low speed about 5 times, a second or two each time. Take a peek — if there is still a lot of flour on the surface of the dough, pulse a couple of times more; if not, remove the towel. Continuing at low speed, mix for about 30 seconds more, just until the flour disappears into the dough — for the best texture, work the dough as little as possible once the flour is added, and don’t be concerned if the dough looks a little crumbly. Toss in the chocolate pieces and mix only to incorporate.

Turn the dough out onto a work surface, gather it together and divide it in half. Working with one half at a time, shape the dough into logs that are 1 1/2 inches in diameter. Wrap the logs in plastic wrap and refrigerate them for at least 3 hours. (The dough can be refrigerated for up to 3 days or frozen for up to 2 months. If you’ve frozen the dough, you needn’t defrost it before baking — just slice the logs into cookies and bake the cookies 1 minute longer.)

Getting ready to bake: Center a rack in the oven and preheat the oven to 325°F (160°C). Line two baking sheets with parchment or silicone mats.

Working with a sharp thin knife, slice the logs into rounds that are 1/2 inch thick. (The rounds are likely to crack as you’re cutting them — don’t be concerned, just squeeze the bits back onto each cookie.) Arrange the rounds on the baking sheets, leaving about one inch between them.

Bake the cookies one sheet at a time for 12 minutes — they won’t look done, nor will they be firm, but that’s just the way they should be. Transfer the baking sheet to a cooling rack and let the cookies rest until they are only just warm, at which point you can serve them or let them reach room temperature.

Serving: The cookies can be eaten when they are warm or at room temperature — I prefer them at room temperature, when the textural difference between the crumbly cookie and the chocolate bits is greatest — and are best suited to cold milk or hot coffee.

Do ahead: Packed airtight, cookies will keep at room temperature for up to 3 days; they can be frozen for up to 2 months. They can also be frozen in log form for months, and can be sliced and baked directly from the freezer, adding a coupld minutes to the baking time.

Saturday, March 6, 2010

You are my biggest what if - Chocolate Ricotta Turnovers

I should probably keep this blog free of personal stuff, keep it professional and talk only about food but two weeks ago I turned 26... and it got me thinking. This always happens to me on my birthday when the weight of years past start adding up. I think and think and most of the time I end up summing all my what if.

Lately I've been feeling like something is not going the way it's supposed to be, or it should be, in my life. I'm 26 already, the big 30 is just around the corner, I'm not even close to getting married or putting up a family and comments such as "you know, you're not getting any younger" are starting to become a little too frequent for my own liking and honestly it's starting to affect me in ways it shouldn't. I know things happen when they're supposed to but what if it's too late? Maybe I'm the problem... maybe I should stop believing in fairy tales, in Prince Charming and just grow up already! But then again, I don't wanna feel like I'm settling... I may not be the best catch in the world but I think I still deserve better than settling.

And in all this thinking I've realized that I've always given to guys I fell for more than what they probably deserved... And got nothing but heartache in return. Heck I almost bought a real panda bear for one of them (well, sponsored one... kinda like you do with stars) and I flew across the world for another one... and this last one will always be my biggest what if. What if I had been more like this? What if I had done this instead of that? What if I had told him those three little words when I felt them? What if I had never met him at all? Four years have past and he's still keeping me tied to him in a way of another.

So, you are my biggest what if but I've grown tired of not knowing where I stand with you. Our time has come and gone and now I've decided that I'll stop wondering what could have been if I'd done things differently with you because, in the end, I know that I've done the best I could.

But this doesn't change the fact that I'm 26, turning 30, and I'm just lost...

Yes, that is melted chocolate oozing out of it!!


You're probably thinking "enough with the rambling and lets get to the recipe already!!"

I am terribly sorry, I will *try* to never ever let this happen ever again, my apologies. Sooo lets move on to the good stuff, shall we.

My cousin E is the only one I really feel understands me because I think we're at the same point in our lives, and so I know I can tell her everything. And although it was my birthday, these turnovers were a gift to her, to thank her for being the sister I've never had (although my brother is AWESOME). The recipe is from The Golden Book of Chocolate and I got it as a gift this Christmas. As we were looking through it together that day, she stopped on these turnovers' recipe and demanded that I made them for her. So here they are!! And E, thank you for being the best confident I could have ever asked for. (Needless to say, she loved them... but what's not to love about them, there just Heaven in a turnover!!).


Chocolate Ricotta Turnovers
Yields 12 turnovers

12 oz (350 gr) frozen puff pastry, thawed
1 large egg, lightly beaten
1/4 (50 gr) demerara sugar

For the filling
1 cup (250 gr) ricotta cheese, drained
1/3 cup (85 gr) granulated sugar
2 large egg yolks
1 tbsp vanilla extract
2 tbsp all-purpose flour
1 tbsp unsweetened cocoa powder
1/3 cup (75 gr) raisins (I omitted - not fond of raisins)
2 oz (60 gr) semisweet chocolate, chopped (I felt lazy and didn't feel like chopping so I dumped a whole bunch of chocolate chips in the bowl)

Preheat the oven to 400F (200C) and line two baking sheets with parchment paper.

Prepare the filling: Process the ricotta in a food processor for a few seconds until smooth. Transfer to a bowl and mix in the sugar, egg yolks and vanilla. In a separate bowl combine the flour and the cocoa and fold into the mixture. Stir in the raisins and chocolate. Cover and chill in the refrigerator for 30 minutes.

Place the pastry on a lightly floured work surface. Dust the top with flour and roll out into a 20x15 inch (38x50 cm) rectangle about 1/4 inch (5mm) thick. Trim the edges to straighten and spoon 2 tablespoons of the filling onto the center of each pastry square.

Brush the beaten egg around the edges of the each square and fold one corner diagonally over to meet the opposite corner, forming a triangle. Press down on the seams, joining the 2 layers. Place the turnovers on the prepared baking sheets 1 inch (2.5cm) apart. Refrigerate 15 minutes, brush each turnover top with the remaining egg and sprinkle with demerare sugar. Bake until golden brown, 25-30 minutes. Transfer to a wire rack and let cool.

Monday, November 16, 2009

Berries Leftover Part 2: Strawberry Hand Pies

This is the last of the Berries Leftover series and I've used the strawberries left over from my mini fruit tarts. i found the recipe on Martha Stewart's website and, needless to say, another delicious treat! The Pâte Brisée is just absolutely fabulous!

Strawberry Hand Pies
Makes 6

1 1/2 cups strawberries, hulled and cut in half or quarters, depending on size
2 tablespoons granulated sugar
1 tablespoon cornstarch
All-purpose flour, for work surface
1/2 recipe Pâte Brisée (see below)
1 large egg, lightly beaten
Sanding sugar, for sprinkling

Preheat the oven to 425 degrees F. Line a baking sheet with parchment paper. In a medium bowl, add strawberries, sugar, and cornstarch; stir to combine, set aside.

On a lightly floured work surface, roll dough into a large rectangle, about 1/8 inch thick. Using a 5-inch cookie cutter, cut out 6 rounds. Transfer rounds to prepared baking sheet.

Place about 2 tablespoons of the strawberry mixture onto one-half of each round. Lightly brush egg around the edge of the covered half of each round. Fold remaining dough over to enclose, forming a half moon. Gently press edges together to seal. Brush the tops of each pie with egg. Using a paring knife, slash the top of each pie. Sprinkle generously with sanding sugar.

Bake until golden brown, 20 to 25 minutes. Transfer pies to a wire rack to cool slightly before serving. Or let cool completely, and store in an airtight container at room temperature up to 4 days.

Pâte Brisée

2 1/2 cups all-purpose flour
1 teaspoon salt
1 teaspoon sugar
1 cup unsalted butter, chilled and cut into small pieces
1/4 to 1/2 cup ice water

In the bowl of a food processor, combine flour, salt, and sugar. Add butter, and process until the mixture resembles coarse meal, 8 to 10 seconds.

With machine running, add ice water in a slow, steady stream through feed tube. Pulse until dough holds together without being wet or sticky; be careful not to process more than 30 seconds. To test, squeeze a small amount together: If it is crumbly, add more ice water, 1 tablespoon at a time.

Divide dough into two equal balls. Flatten each ball into a disk, and wrap in plastic. Transfer to the refrigerator, and chill at least 1 hour. Dough may be stored, frozen, up to 1 month.

Thursday, November 12, 2009

Leftover Berries Part 1: Raspberry and Blueberry Vanilla Pound Cake

After a week of cake decorating, I wanted to bake something really simple but oh so flavorfull. I also had some raspberries and blueberries left over from the mini tarts that I wanted to use, hence the berry pound cake.


Let's just say it's so yummy, that half of it was gone in less than an hour... and we are only 3 at home!!


Vanilla Pound Cake

Adapted from Dinner with Kirsten

fresh raspberries
fresh blueberries
3 cups all-purpose flour
2 teaspoons baking powder
1/2 teaspoon salt
2 sticks (8 ounces) unsalted butter, at room temperature
2 cups sugar
3 large eggs, at room temperature, whisked to blend
1 cup milk, at room temperature
2 teaspoons pure vanilla extract

Position a rack to the lower third of the oven and preheat to 350 degrees. Butter and flour a 10-inch tube pan. Mix the berries with 2 tablespoons of the flour and keep in fridge.

Sift the remaining flour, baking powder and salt together into a bowl or onto a sheet of waxed paper. Set the mixed ingredients aside.

Put the butter into the bowl of a mixer and beat at medium speed until smooth. With the mixer running, add the sugar in a steady stream. Stop the mixer and scrape down the paddle and the sides of the bowl with a rubber spatula. Continue to beat at medium speed until the mixture is very light and fluffy, about 4 to 5 minutes.

With the mixer still at medium speed, begin to add the eggs in small additions, about a tablespoon at a time. If the mixture becomes watery or shiny, stop adding the eggs and beat at an increased speed just until it smooths out. When the batter has come together again, decrease the speed to medium and continue adding the eggs, scraping down the paddle and sides of the bowl from time to time; it will take 3 to 4 minutes to incorporate the eggs. The mixture is properly combined when it appears white, fluffy and increased in volume.

Reduce the mixter speed to low and add the flour mixture and the milk alternately—4 additions of flour, 3 of milk—scraping the paddle and bowl frequently and mixing until the batter is smooth after each addition. Add the vanilla and mix just to blend. Fold in very gently the berries with a spatula.

Spoon the batter into the prepared pan and smooth the top with a spatula. Bake for 55 to 65 minutes, or until a wooden toothpick inserted in the center of the cake comes out clean. Transfer the cake to a cooling rack and allow it to cool in the pan for 10 minutes. Invert the cake onto a rack, remove the pan, and cool to room temperature.

Monday, October 26, 2009

October DB Challenge: French Macarons

The 2009 October Daring Bakers’ challenge was brought to us by Ami S. She chose macarons from Claudia Fleming’s The Last Course: The Desserts of Gramercy Tavern as the challenge recipe.

Who ever said that third time is a charm? Well they were fools! Or at least this concept doesn't apply to macarons because, in my case, it took me 4 tries before getting good looking macarons, with the little ruffled feet and a nice height and dry bottoms... no bellies left behind on the baking tray!! Yaaaa!!

First batch are chocolate macarons with a whipped chocolate ganache and a few with chatilly cream and a fresh raspberry half hidden inside. The feet are a little tiny and tops cracked on half of the batch but I "fixed" the problem with my second batch.


Second batch are pink macarons with raspberry curd, smooth shiny tops and beautifully ruffled feet. Since October is Breast Cancer Awarness month, I wanted to go with the pink theme. I didn't have powder food coloring for the shells. I had only gel coloring, which explains the pink freckles... totally unintentional but sooo cute!!


Those who know me well also know that I've been "studying" the art of macaron making for about a year now but never really had the courage to try my luck. I've read everything that I could find on macaron but yet always left them on my "to bake list".

It is hard to believe that something created out of 4 normal ingredients could be so hard to get and to be honest with you I'm scared of trying again... what if I got them right out of pure coincedence? I'd like to think that I actually was able to muster enough self-confidence to not let the macaron overpower me, so to all of you out there who are still trying to bake macarons DO NOT give up! Keep on going until you get it right because it is oh so worth it!


Now I know what all the rave was about... Now I am a new macaron lover!

Friday, June 19, 2009

Summer Breeze Cupcakes (ICE June: Summer Berries)

I'm baaaaaack!!!

I haven't submitted a cupcake for the ICE Challenges since a while, I never seemed to be inspired by the ingredients... until this month! I absolutely adore summer berries and my inspiration juices came back!

When summer comes around I usually eat less and try to stay as light as possibile. Not because of the whole "fit-in-your-bikini" story but it just happens on its own, I lose my appetite for heavy, fatty, greasy stuff. On the other hand, I crave fresh food, especially fruits. This got reflected in my cupcakes this month: sorry guys, no buttercreams and no chocolate this month!

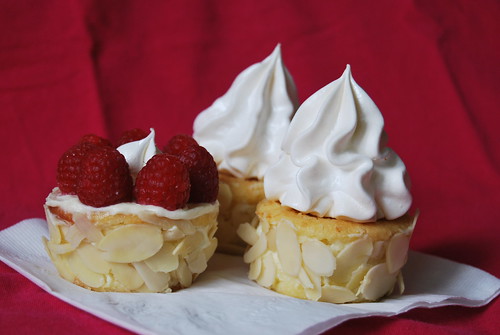
Instead I propose light as feather meringues, tangy lemon, crunchy almonds and fresh berries!


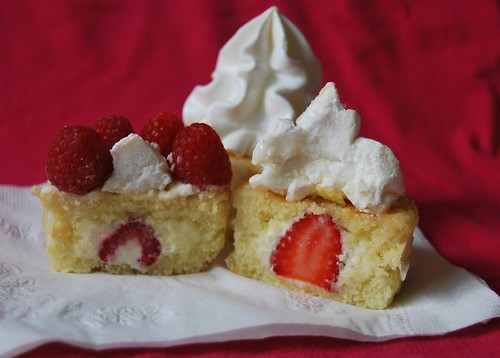
These are almond cupcakes with a center of lemon curd cream and freash strawberry or raspberry. The are topped with a super delishously sweet meringue.


If you liked my cupcakes, please vote for me!! To cast your vote go to No One Puts Cupcake in a Corner!! Voting starts on June 28th at 8pm and ends on July 6th at noon.

RECIPE FOR 12 CUPCAKES:

Almond cupcakes (from Canadian Living)
1/2 cup butter, softened
1 cup granulated sugar
2 eggs
1/2 tsp almond extract
1 cup all-purpose flour
1/2 cup ground almonds
1 tsp baking powder
1/4 tsp salt
1/2 cup milk

In large bowl, beat butter with sugar until fluffy; beat in eggs, 1 at a time. Beat in almond extract.

In separate bowl, whisk together flour, ground almonds, baking powder and salt. Stir into butter mixture alternately with milk, making 3 additions of dry ingredients and 2 of milk. Spoon into paper-lined or greased muffin cups.

Bake in 350°F (180°C) oven until cake tester inserted in centre comes out clean, 20 to 25 minutes. Transfer to rack; let cool.


Lemond Curd Cream (from Tartelette)
grated zest of 1 lemon
1 cup lemon juice
1/2 cup sugar
2 eggs
1 cup heavy cream
fresh rapsberries and strawberries

Combine the zest, sugar, juice in a saucepan, and bring to a simmer. In a small bowl, beat the eggs until light. Beat some of the lemon mixture into the eggs to temper.

Scrape the mixture back into the saucepan and cook stirring constantly until it thickens up, about 5 minutes. Strain and let it cool to room temperature, covered with plastic wrap until ready to use.

In a stand mixer, whip the cream to medium stiff peaks. Incorporate the cooled lemon curd in three additions. Cut the cupcakes in two layers, remove some cake from the center of each layer. On the bottom spoon some cream, put a berry, spoon some cream in the top layer and recompose the cupcake.


Meringue tops
2 large egg whites, at room temperature
1/4 tsp white vinegar
1/3 cup granulated sugar
1/4 cup powdered sugar, sifted

Preheat oven to 175ºF. Line a large baking sheet with parchment paper.

Beat the egg whites and vinegar with an electric mixer until they turn white and hold soft peaks. Still beating, add the granulated sugar a little at a time—you’ll have a shiny, bright-white meringue. Keep beating, gradually adding the powdered sugar. Pipe (or spoon for a more rustic look) the sticky meringue onto the baking sheet.

Bake until you can easily detach the meringue puffs from the parchment and they have lost their shine.


Our June ETSY PRIZE-PACK is from artists: INSANEJELLYFISH, SWEET CUPPIN CAKES CUPCAKERY SUPPLY and CAKESPY

Our corporate prize providers: HEAD CHEFS by FIESTA PRODUCTS, HELLO CUPCAKE by Karen Tack and Alan Richardson, JESSIE STEELE APRONS , TASTE OF HOME books and UPWITHCUPCAKES.COM will be providing our winner with one of their cute cupcake attitue t's!